体验 TiSpark 基于 TiDB v6.0 (DMR) 的最小实践
作者:边城元元
一、概述
正值 TiDB v6.0 (DMR) 发布,本地虚拟机体验一把 TiSpark,感受一下 TiDB 的强大!
二、TiSpark简述
2.1 TiSpark是什么?
TiSpark 是 PingCAP 为解决用户复杂 OLAP 需求而推出的产品。TiSpark 本身是 Spark 的一个扩展,利用了 Spark 提供的 Extensions 机制。
2.2 依赖其他组件吗?
TiSpark 依赖于 TiKV 集群和 Placement Driver (PD),也需要你搭建一个 Spark 集群(已有或全新搭建)。
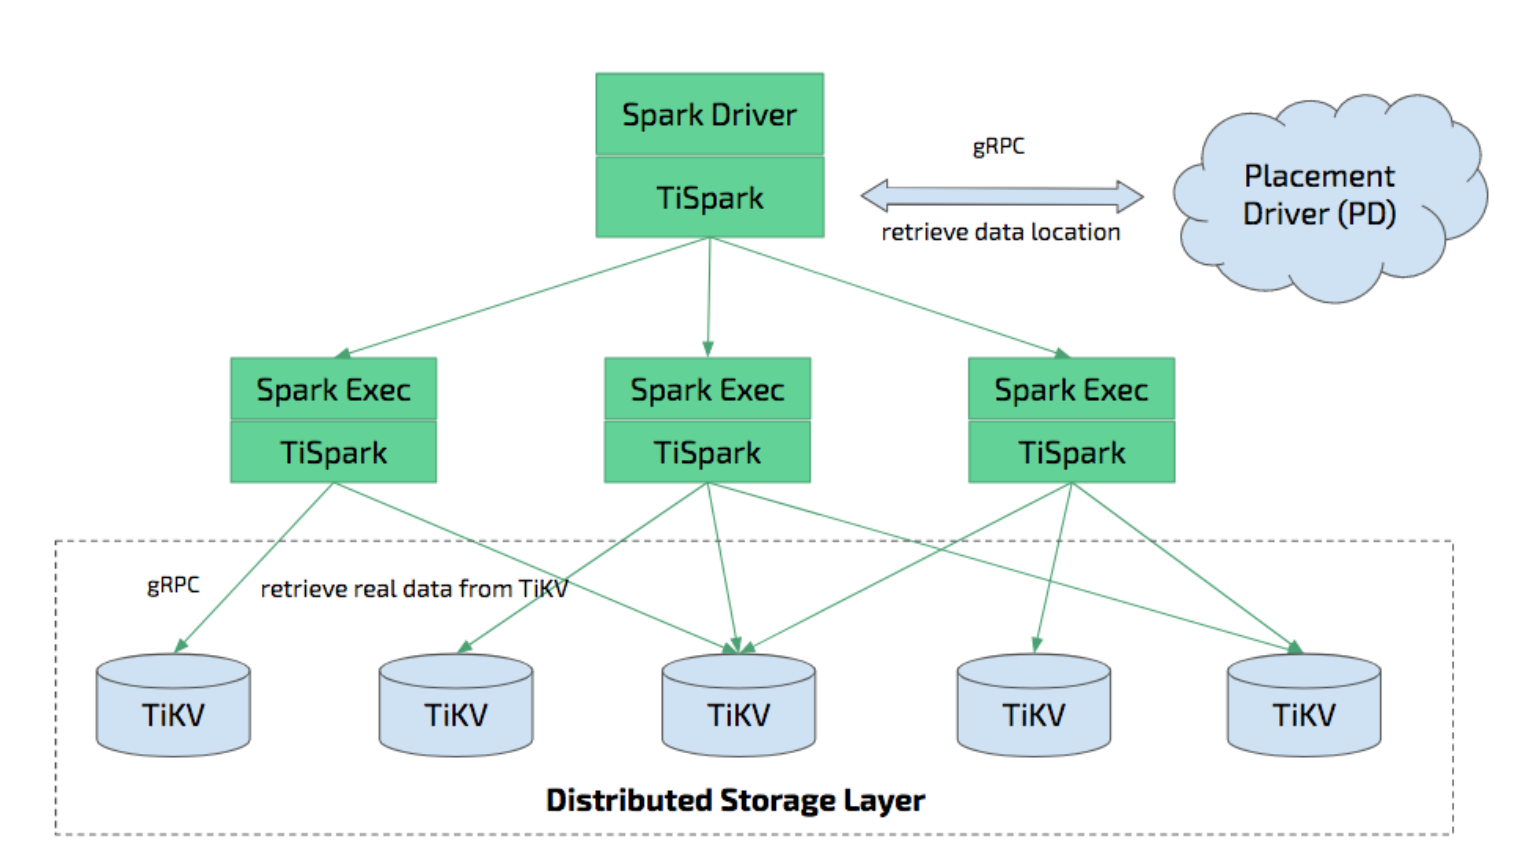
2.3 架构在TiDB中的位置?
TiSpark 是将 Spark SQL 直接运行在分布式存储引擎 TiKV 上的 OLAP 解决方案。
2.4 TiSpark 能做什么?
- 使用 TiSpark 进行数据分析和 ETL
2.5 TiSpark的优势是什么?
- 简化了系统架构和运维
- 从数据集群的角度看,TiSpark + TiDB 可以让用户无需进行脆弱和难以维护的 ETL,直接在同一个平台进行事务和分析两种工作,简化了系统架构和运维。
- 分布式写入 TiKV
- 相比使用 Spark 结合 JDBC 的方式写入 TiDB,分布式写入 TiKV 可以实现事务(要么全部数据写入成功,要么全部都写入失败),并且写入速度会更快。
- 使用 Spark 生态圈提供的多种工具进行数据处理
- 用户借助 TiSpark 项目可以在 TiDB 上使用 Spark 生态圈提供的多种工具进行数据处理。例如,使用 TiSpark 进行数据分析和 ETL;使用 TiKV 作为机器学习的数据源;借助调度系统产生定时报表等等。
三、安装TiDB集群和TiSpark
环境: Centos 7.3 虚拟机 2C 4G TiDB V6.0
准备工作
# 1、Centos7.3
# # 使用virtualbox 导入介质配置虚拟机centos7.3   大约1分钟配置完毕!
# # 这里不再详细说明

# 2、ssh
# # 调大 sshd 服务的连接数限制
# # 修改 /etc/ssh/sshd_config 将 MaxSessions 调至 30。
sed -i 's/#MaxSessions.*/MaxSessions 100/g' /etc/ssh/sshd_config
# # 重启 sshd 服务
systemctl restart sshd

# 3、安装tiup ,cluster组件
curl --proto '=https' --tlsv1.2 -sSf https://tiup-mirrors.pingcap.com/install.sh | sh
source .bash_profile

tiup cluster

# 4、升级
tiup update --self && tiup update cluster
3.1 安装TiDB集群 cluster111和监控
3.1.1 Cluster111 拓扑
# 参考 https://github.com/pingcap/docs-cn/blob/master/config-templates/complex-mini.yaml
# cluster111.yaml

# # Global variables are applied to all deployments and used as the default value of
# # the deployments if a specific deployment value is missing.
global:
  user: "tidb"
  ssh_port: 22
  deploy_dir: "/tidb-deploy"
  data_dir: "/tidb-data"

# # Monitored variables are applied to all the machines.
monitored:
  node_exporter_port: 9100
  blackbox_exporter_port: 9115
  # deploy_dir: "/tidb-deploy/monitored-9100"
  # data_dir: "/tidb-data/monitored-9100"
  # log_dir: "/tidb-deploy/monitored-9100/log"

# # Server configs are used to specify the runtime configuration of TiDB components.
# # All configuration items can be found in TiDB docs:
# # - TiDB: https://pingcap.com/docs/stable/reference/configuration/tidb-server/configuration-file/
# # - TiKV: https://pingcap.com/docs/stable/reference/configuration/tikv-server/configuration-file/
# # - PD: https://pingcap.com/docs/stable/reference/configuration/pd-server/configuration-file/
# # All configuration items use points to represent the hierarchy, e.g:
# #   readpool.storage.use-unified-pool
# #
# # You can overwrite this configuration via the instance-level `config` field.

server_configs:
  tidb:
    log.slow-threshold: 300
    binlog.enable: false
    binlog.ignore-error: false
  tikv:
    # server.grpc-concurrency: 4
    # raftstore.apply-pool-size: 2
    # raftstore.store-pool-size: 2
    # rocksdb.max-sub-compactions: 1
    # storage.block-cache.capacity: "16GB"
    # readpool.unified.max-thread-count: 12
    readpool.storage.use-unified-pool: false
    readpool.coprocessor.use-unified-pool: true
  pd:
    schedule.leader-schedule-limit: 4
    schedule.region-schedule-limit: 2048
    schedule.replica-schedule-limit: 64

pd_servers:
  - host: 10.0.2.15
    # ssh_port: 22
    # name: "pd-1"
    # client_port: 2379
    # peer_port: 2380
    # deploy_dir: "/tidb-deploy/pd-2379"
    # data_dir: "/tidb-data/pd-2379"
    # log_dir: "/tidb-deploy/pd-2379/log"
    # numa_node: "0,1"
    # # The following configs are used to overwrite the `server_configs.pd` values.
    # config:
    #   schedule.max-merge-region-size: 20
    #   schedule.max-merge-region-keys: 200000

tidb_servers:
  - host: 10.0.2.15
    # ssh_port: 22
    # port: 4000
    # status_port: 10080
    # deploy_dir: "/tidb-deploy/tidb-4000"
    # log_dir: "/tidb-deploy/tidb-4000/log"
    # numa_node: "0,1"
    # # The following configs are used to overwrite the `server_configs.tidb` values.
    # config:
    #   log.slow-query-file: tidb-slow-overwrited.log

tikv_servers:
  - host: 10.0.2.15
    # ssh_port: 22
    # port: 20160
    # status_port: 20180
    # deploy_dir: "/tidb-deploy/tikv-20160"
    # data_dir: "/tidb-data/tikv-20160"
    # log_dir: "/tidb-deploy/tikv-20160/log"
    # numa_node: "0,1"
    # # The following configs are used to overwrite the `server_configs.tikv` values.
    # config:
    #   server.grpc-concurrency: 4
    #   server.labels: { zone: "zone1", dc: "dc1", host: "host1" }


monitoring_servers:
  - host: 10.0.2.15
    # ssh_port: 22
    # port: 9090
    # deploy_dir: "/tidb-deploy/prometheus-8249"
    # data_dir: "/tidb-data/prometheus-8249"
    # log_dir: "/tidb-deploy/prometheus-8249/log"

grafana_servers:
  - host: 10.0.2.15
    # port: 3000
    # deploy_dir: /tidb-deploy/grafana-3000

alertmanager_servers:
  - host: 10.0.2.15
    # ssh_port: 22
    # web_port: 9093
    # cluster_port: 9094
    # deploy_dir: "/tidb-deploy/alertmanager-9093"
    # data_dir: "/tidb-data/alertmanager-9093"
    # log_dir: "/tidb-deploy/alertmanager-9093/log"
3.1.2 安装Cluster1111
```shell

# 1、 查看 TiUP 支持的最新可用版本 (选择 v6.0.0)
tiup list tidb

# 2、安装cluster111
# tiup cluster deploy <cluster-name> <tidb-version> ./topo.yaml --user root -p
tiup cluster check  ./cluster111.yml --user root -p
tiup cluster deploy cluster111 v6.0.0 ./cluster111.yml --user root -p

#会提示输入密码
#提示输入y/n


# 提示 “Cluster `cluster111` deployed successfully, you can start it with command: `tiup cluster start cluster111 --init`”  表示安装成功

# 3、通过命令查看集群
tiup cluster list

# 4、初始化集群
tiup cluster start cluster111 --init
```

# 5、查看集群
tiup cluster display cluster111

注意:
- 使用
tiup cluster start cluster111 --init将给root用户生成随机密码- 如果不加--init 将不生成随机密码
- 演示期间把密码修改为123456。ALTER USER 'root' IDENTIFIED BY '123456';
3.1.3 查看dashboard
- 虚拟机设置端口转发4000->4000,2379,2379
- http://127.0.0.1:2379/dashboard root=123456

3.1.4 Mysql客户端连接TiDB
mysql -h127.0.0.1 -uroot -P4000 -p

3.2 扩容的方式安装TiSpark
本文以扩容的方式安装TiSpark。在安装TiDB集群的时候,一同安装TiSpark也是可以的(通过配置集群拓扑文件)。
3.2.1 TiSpark最小拓扑
# 参考 https://github.com/pingcap/docs-cn/blob/master/config-templates/complex-tispark.yaml
# 仅保留 tispark的部分
# cluster111-v6.0.0-tispark.yaml

tispark_masters:
  - host: 10.0.2.15
    # ssh_port: 22
    # port: 7077
    # web_port: 8080
    # deploy_dir: "/tidb-deploy/tispark-master-7077"
    # java_home: "/usr/local/bin/java-1.8.0"
    # spark_config:
    #   spark.driver.memory: "2g"
    #   spark.eventLog.enabled: "False"
    #   spark.tispark.grpc.framesize: 268435456
    #   spark.tispark.grpc.timeout_in_sec: 100
    #   spark.tispark.meta.reload_period_in_sec: 60
    #   spark.tispark.request.command.priority: "Low"
    #   spark.tispark.table.scan_concurrency: 256
    # spark_env:
    #   SPARK_EXECUTOR_CORES: 5
    #   SPARK_EXECUTOR_MEMORY: "10g"
    #   SPARK_WORKER_CORES: 5
    #   SPARK_WORKER_MEMORY: "10g"

# NOTE: multiple worker nodes on the same host is not supported by Spark
tispark_workers:
  - host: 10.0.2.15
    # ssh_port: 22
    # port: 7078
    # web_port: 8081
    # deploy_dir: "/tidb-deploy/tispark-worker-7078"
    # java_home: "/usr/local/bin/java-1.8.0"
3.2.2 安装TiSpark
安装jdk8
在 Oracle JDK 官方下载页面下载 JDK 1.8 当前最新版,本示例中下载的版本为
jdk-8u202-linux-x64.tar.gz。 解压并根据您的 JDK 部署目录设置环境变量,编辑~/.bashrc文件 增加:export JAVA_HOME=/usr/local0/webserver/java/jdk1.8.0_202
export PATH=$JAVA_HOME/bin:$PATH验证jdk
java -version
[root@tispark jdk1.8.0_202]# java -version
java version "1.8.0_202"
Java(TM) SE Runtime Environment (build 1.8.0_202-b08)
Java HotSpot(TM) 64-Bit Server VM (build 25.202-b08, mixed mode)
扩容的方式安装TiSpark
tiup cluster scale-out cluster111 ./cluster111-v6.0.0-tispark.yaml -uroot -p
输入y 继续安装

上图:有2个信息1、扩容安装1个Tispark master 和1个Tispark work 成功 2、扩容的2个节点启动失败(因为需要配置TiSpark和启动Spark服务端)下图证实了这点。

四、启动Spark和TiSpark
4.1 配置TiSpark
tispark-master中的 /tidb-deploy/tispark-master-7077/conf/spark-defaults.conf 中增加如下配置:
# sql扩展类
spark.sql.extensions   org.apache.spark.sql.TiExtensions
# master节点
spark.master   spark://10.0.2.15:7077
# pd节点  多个pd用逗号隔开 如:10.16.20.1:2379,10.16.20.2:2379,10.16.20.3:2379
spark.tispark.pd.addresses 10.0.2.15:2379
4.2 部署TiSpark
TiSpark 的 jar 包可以在 TiSpark Releases 页面下载对应版本的 jar 包并拷贝到合适的目录
TiDB官方在安装TISpark时已经在安装目录下的jars下有相关的jar包
4.2.1 已有 Spark 集群的部署方式
如果在已有 Spark 集群上运行 TiSpark,无需重启集群。可以使用 Spark 的
--jars参数将 TiSpark 作为依赖引入# spark-shell --jars $TISPARK_FOLDER/tispark-${name_with_version}.jar
/tidb-deploy/tispark-master-7077/bin/spark-shell --jars /tidb-deploy/tispark-master-7077/jars/tispark-assembly-2.4.1.jar
4.2.2 没有 Spark 集群的部署方式 (本地测试使用这种方式)
- 推荐使用 Spark Standalone 方式部署(对于 Standalone 模式且无需 Hadoop 支持,则选择 Spark 2.3.x 或者 Spark 2.4.x 且带有 Hadoop 依赖的 Pre-build with Apache Hadoop 2.x 任意版本。)
- 需将 TiSpark jar 包拷贝到
${SPARKPATH}/jars目录下。
4.3 启动本地测试Spark
/tidb-deploy/tispark-master-7077/sbin/start-all.sh
也可以分开启动:先启动master 再启动slave
启动之后,过几秒钟 验证TiSpark是否启动
tiup cluster display cluster111

如果没有启动,可以手动启动TiSpark节点
# 手动启动 tispark节点
tiup cluster start cluster111 -N 10.0.2.15:707,10.0.2.15:7078
五、测试
5.1 导入样例数据
curl -L http://download.pingcap.org/tispark-sample-data.tar.gz -o tispark-sample-data.tar.gz
tar -zxvf tispark-sample-data.tar.gz
cd tispark-sample-data

# 导入示例数据
mysql --local-infile=1 -h 127.0.0.1 -P 4000 -u root < dss.ddl
登录 TiDB 并验证数据包含 TPCH_001 库及以下表:

5.2 spark-shell 像使用原生 Spark 一样
# 启动spark-shell
/tidb-deploy/tispark-master-7077/bin/spark-shell

scala> spark.sql("use tpch_001")
res3: org.apache.spark.sql.DataFrame = []

scala> spark.sql("select count(*) from lineitem").show
+--------+
|count(1)|
+--------+
|   60175|
+--------+


scala> spark.sql(
     |       """select
     |         |   l_returnflag,
     |         |   l_linestatus,
     |         |   sum(l_quantity) as sum_qty,
     |         |   sum(l_extendedprice) as sum_base_price,
     |         |   sum(l_extendedprice * (1 - l_discount)) as sum_disc_price,
     |         |   sum(l_extendedprice * (1 - l_discount) * (1 + l_tax)) as sum_charge,
     |         |   avg(l_quantity) as avg_qty,
     |         |   avg(l_extendedprice) as avg_price,
     |         |   avg(l_discount) as avg_disc,
     |         |   count(*) as count_order
     |         |from
     |         |   lineitem
     |         |where
     |         |   l_shipdate <= date '1998-12-01' - interval '90' day
     |         |group by
     |         |   l_returnflag,
     |         |   l_linestatus
     |         |order by
     |         |   l_returnflag,
     |         |   l_linestatus
     |       """.stripMargin).show

 # 如下图结果

更多样例请参考 pingcap/tispark-test
5.3 spark-sql 像使用sql一样
# 启动spark-sql
cd /tidb-deploy/tispark-master-7077/bin/
./spark-sql

# web ui 需要宿主机端口转发到虚拟机4041->4041
# http://127.0.0.1:4041/#spark
# http://127.0.0.1:4040/#spark-sql
# http://127.0.0.1:8080/#Spark Master

示例如下:
# show databases;
spark-sql> show databases;
22/04/09 16:36:02 INFO PDClient: Switched to new leader: [leaderInfo: 10.0.2.15:2379]
22/04/09 16:36:08 INFO ReflectionUtil$: tispark class url: file:/tidb-deploy/tispark-master-7077/jars/tispark-assembly-2.4.1.jar
22/04/09 16:36:08 INFO ReflectionUtil$: spark wrapper class url: jar:file:/tidb-deploy/tispark-master-7077/jars/tispark-assembly-2.4.1.jar!/resources/spark-wrapper-spark-2_4/
22/04/09 16:36:08 INFO HiveMetaStore: 0: get_databases: *
22/04/09 16:36:08 INFO audit: ugi=root  ip=unknown-ip-addr      cmd=get_databases: *
22/04/09 16:36:09 INFO CodeGenerator: Code generated in 864.536604 ms
default
test
tpch_001
mysql
Time taken: 20.766 seconds, Fetched 4 row(s)
22/04/09 16:36:09 INFO SparkSQLCLIDriver: Time taken: 20.766 seconds, Fetched 4 row(s)


# use tpch_001;
spark-sql> use tpch_001;
22/04/09 16:38:18 INFO HiveMetaStore: 0: get_database: tpch_001
22/04/09 16:38:18 INFO audit: ugi=root  ip=unknown-ip-addr      cmd=get_database: tpch_001
Time taken: 0.353 seconds
22/04/09 16:38:18 INFO SparkSQLCLIDriver: Time taken: 0.353 seconds


# show tables;
spark-sql> show tables;
22/04/09 16:38:21 INFO HiveMetaStore: 0: get_database: tpch_001
22/04/09 16:38:21 INFO audit: ugi=root  ip=unknown-ip-addr      cmd=get_database: tpch_001
22/04/09 16:38:22 INFO HiveMetaStore: 0: get_database: global_temp
22/04/09 16:38:22 INFO audit: ugi=root  ip=unknown-ip-addr      cmd=get_database: global_temp
22/04/09 16:38:22 INFO HiveMetaStore: 0: get_database: default
22/04/09 16:38:22 INFO audit: ugi=root  ip=unknown-ip-addr      cmd=get_database: default
22/04/09 16:38:22 INFO HiveMetaStore: 0: get_database: default
22/04/09 16:38:22 INFO audit: ugi=root  ip=unknown-ip-addr      cmd=get_database: default
22/04/09 16:38:22 INFO HiveMetaStore: 0: get_tables: db=default pat=*
22/04/09 16:38:22 INFO audit: ugi=root  ip=unknown-ip-addr      cmd=get_tables: db=default pat=*
22/04/09 16:38:22 INFO CodeGenerator: Code generated in 47.307373 ms
tpch_001        customer        false
tpch_001        lineitem        false
tpch_001        nation  false
tpch_001        orders  false
tpch_001        part    false
tpch_001        partsupp        false
tpch_001        region  false
tpch_001        supplier        false
Time taken: 1.038 seconds, Fetched 8 row(s)
22/04/09 16:38:22 INFO SparkSQLCLIDriver: Time taken: 1.038 seconds, Fetched 8 row(s)


# select count(*) from lineitem
spark-sql> select count(*) from lineitem;


# 长sql语句
spark-sql> select
           l_returnflag,
           l_linestatus,
           sum(l_quantity) as sum_qty,
           sum(l_extendedprice) as sum_base_price,
           sum(l_extendedprice * (1 - l_discount)) as sum_disc_price,
           sum(l_extendedprice * (1 - l_discount) * (1 + l_tax)) as sum_charge,
           avg(l_quantity) as avg_qty,
           avg(l_extendedprice) as avg_price,
           avg(l_discount) as avg_disc,
           count(*) as count_order
        from
           lineitem
        where
           l_shipdate <= '1998-09-02'
        group by
           l_returnflag,
           l_linestatus
        order by
           l_returnflag,
           l_linestatus;


5.4 TiSpark写数据(spark-sql)
5.4.1 tispark write is disabled.
在通过spark-sql写数据时提示“SparkSQL entry for tispark write is disabled. Set spark.tispark.write.allow_spark_sql to enable.”
解决方式: 需要在 conf/spark-defaults.conf 里面配置一下下面的参数
vim /tidb-deploy/tispark-master-7077/conf/spark-defaults.conf
#增加 配置
spark.tispark.write.allow_spark_sql true

5.4.2 写数据测试
# 1、在 TiDB 中创建目标表
create table tpch_001.target_table_customer (
  `c_custkey` int(11) not null,
  `c_name` varchar(25) not null,
  `c_address` varchar(40) not null,
  `c_nationkey` int(11) not null,
  `c_phone` char(15) not null,
  `c_acctbal` decimal(15,2) not null,
  `c_mktsegment` char(10) not null,
  `c_comment` varchar(117) not null
)


# 2、将 TiDB 的表 target_table_customer 注册到 Spark Catalog
create table customer_dst using tidb options (
tidb.user 'root',
tidb.password '',
tidb.addr '10.0.2.15',
tidb.port '4000',
database 'tpch_001',
table 'target_table_customer'
);


# 3、使用 SparkSQL 插入数据到 TiDB
INSERT INTO customer_dst VALUES(1000, 'Customer#000001000', 'AnJ5lxtLjioClr2khl9pb8NLxG2', 9, '19-407-425-2584', 2209.81, 'AUTOMOBILE', '. even, express theodolites upo')

INSERT INTO customer_dst SELECT * FROM tpch_001.customer;
注意:
1、如果出现错误提示“Initial job has not accepted any resources; check your cluster UI to ensure that workers are registered and have sufficient resources” 解决:1)确保tispark-worker已经激活;2)再检查资源:打开http://127.0.0.1:8080/ 发现 running 发现进程过多,可能导致资源不足,随即关闭进程,重新执行。
2、更多示例spark-sql的示例
https://github.com/pingcap/tispark-test/tree/master/tpch/mysql
六、总结
总结
1、一路过来,体验使用TiSpark还算顺利,给PingCAP的同学们点个赞!
2、做数据处理的比较喜欢sql,生产环境中的会使用spark-sql来做数据处理或分析!
3、更多TiSpark的特性还需要继续探索!
4、如果文章中的表述有不当的地方、请私信留言!
参考
https://docs.pingcap.com/zh/tidb/v6.0/tispark-overview#tispark-用户指南
https://docs.pingcap.com/zh/tidb/v6.0/get-started-with-tispark#tispark-快速上手
https://docs.pingcap.com/zh/tidb/v6.0/tispark-deployment-topology/#tispark-部署拓扑
https://zhuanlan.zhihu.com/p/270265931#TiSpark 批量写入 TiDB 原理与实现